Reflection with water ripple and lighting effects in Photoshop
In this tutorial you will learn how to create water reflection with ripple and lighting effects in Photoshop in 5 simple steps.
BEFORE
AFTER
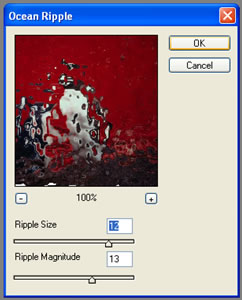
Step 1 : Open an image. Place it somewhere on top and have enough place to but another picture below. Step 2 : Open the same image again. Rotate picture2 (ctrl+T; free transform) and transform it horizontally (image>rotate canvas>flip canvas horizontally) Step 3 : Select picture2 and go to Filter on your menu bar> distort >ocean ripple, and press ok.
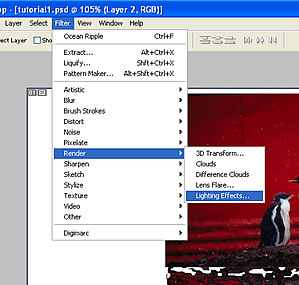
Step 4 : Now you will have an image that has a water reflection. What we want to do next is to have a light effect that concentrates in the center of the whole image. To do this go to your top menu bar, Filter> Render> Lighting Effects. Under Lighting Effects on Style select Soft Omni>OK. Step 5 : Do the same for picture 2.
Task bar is the gray bar generally which sits at the bottom of screen. It generally displays the mighty Start button at the left and the so called System tray at the right. Some times, while playing with windows(may be your kids while dragging some icon or program), it is possible that the position of this task bar is changed to the desktop top, left or right positions. Even though it is a very minor issue for most of us, for newbies, it creates headaches. This guide explains you, how to fix the position of task bar on desktop to a specific place.
Steps for fixing task bar..
Right click your mouse on windows task bar
A context menu will be displayed with several menu items to chose.
Generally, the last but one(the second from last) menu item will be "Lock the task bar" option.
Click it to turn it on. When you turn on a small right mark will be displayed at the left side of the menu item.
Once your turn it on, you'll not be able to move or reposition the task bar.
In this tutorial you will learn how to create different lighting effects using the render filter to get professional and beautiful effects on photographs.
Step 1 : Open a new file by clicking on File > Open. Create a new layer. Step 2 : Open a image by clicking on File > Open. And select the image to your new file canvas. Step 3 : Now to create different lighting effects go to Filter > Render > Lighting Effects.
Step 4 : In the lighting effects let us use the style Flood Light. We can make the changes to the image as shown in the below window. Step 5 : After giving the Flood Light effect the image will look like this, as shown below. You can use the other lighting styles to achieve different lighting effects. Blue OmniIn the lighting effects choose the style Blue Omni. Make the changes to the image as shown in the below window.
After giving the Blue Omni effect the image will look like this, as shown below.
Soft Spotlight In the lighting effects choose the styleSoft Spotlight. Make the changes to the image as shown in the below window.
After giving the Soft Spotlight effect the image will look like this, as shown below.
Flashlight In the lighting effects choose the styleFlashlight. Make the changes to the image as shown in the below window.
In this tutorial you will learn how to create different lighting effects using the render filter to get professional and beautiful effects on photographs.
Step 1 : Open a new file by clicking on File > Open. Create a new layer. Step 2 : Open a image by clicking on File > Open. And select the image to your new file canvas. Step 3 : Now to create different lighting effects go to Filter > Render > Lighting Effects.
Step 4 : In the lighting effects let us use the style Flood Light. We can make the changes to the image as shown in the below window. Step 5 : After giving the Flood Light effect the image will look like this, as shown below. You can use the other lighting styles to achieve different lighting effects. Blue Omni In the lighting effects choose the style Blue Omni. Make the changes to the image as shown in the below window.
After giving the Blue Omni effect the image will look like this, as shown below.
Soft Spotlight In the lighting effects choose the styleSoft Spotlight. Make the changes to the image as shown in the below window.
After giving the Soft Spotlight effect the image will look like this, as shown below.
Flashlight In the lighting effects choose the styleFlashlight. Make the changes to the image as shown in the below window.
Learn how to create bubbles using Photoshop. It's very easy. Make many bubbles as seen below.
Open a new file by clicking on File>Open.
Make a blue color background by choosing the a blue foreground colorand filling the canvas using the Paint Bucket Tool.
Make a circle with Elliptical Marquee Tool. Press the shift key, so that the circle comes round.
Go to Dodge tool. Select Brush as 29 or more depending on your bubble and Range as Highlights and Exposure as 50%.
Then on the left corner of the bubble drag the dodge tool four times in the same place to give the highlight in the bubble.
Make gentle strokes around the bubble with the dodge tool to get the following effect.
Your Bubble is ready, just press ctrl+D to deselect the outline of the circle. You can make as many bubbles as you want like that, even small and big, just repeat the process.
Learn how to create a Smoke Effect in Photoshop CS with Filters and Tools such as Dodge Tool, Burn Tool, Wave Effect, Smudge Tool.
Step 1 : Open a new file by clicking on File>Open. Give a dark background color because you can not see smoke in day light much. Here we gave Blackcolor. Create a new layer. Draw the image of the smoke with Polygonal Lasso Tool. Give a lighter color gradient to the new shape. Make sure it' s a Linear gradient. Here we have given Purple to White gradient. Step 2 : Select DodgeTool and select Range as Highlights,Brush as 18px, Exposure as 50%. Brush all the corners.
Step 3: Go to Filter>Distort>Wave. Select Number of generators as 4, Wavelength min 10 max 250, Amplitude min 15 max 35 Scale 100% for horizontal and vertical. Click on Randomize as much as you think that the picture looks like a smoke. Click on OK. Step 4: Go to Edit >Fade Wave. Select Opacity as 50%. Click on OK. Step 5: Give Opacity as 50% in the layer style on right at the top. Step 6: Go to Smudge Tool and make all the edges smooth by dragging the hand in the picture. Select Brush as 25, Mode as Normal , Strength as 50%.


 Learn how to create bubbles using Photoshop. It's very easy. Make many bubbles as seen below.
  and filling the canvas using the


